2. 3D printing
| Svetainė: | Bios4You |
| Kursas: | (4) Robotics in Biotechnology |
| Knyga: | 2. 3D printing |
| Spausdino: | Επισκέπτης (Guest user) |
| Data: | antradienis, 2026 rugpjūčio 25, 06:42 |
3D printing principles and 3D modelling
3D printers
3D printing is the process of turning a threedimensional computer model into a real thing. It is a fairly new technology that is evolving rapidly and is surprising in its capabilities and adaptability. If until very recently 3D printing was a real breakthrough, now these technologies are being applied in an increasingly diverse area of life. Not only individual parts are printed, but also machine or house constructions. Increasingly, 3D printing is being used in medicine. Teeth, jaws and other bones or parts thereof printing and reproduction is no longer the latest discovery. Researchers are actively working to print and use human skin tissue and the heart. This will avoid waiting for the donor organ, reduce the risk of organ rejection or infection, and reduce other factors.
The material used for printing varies depending on the purpose of the model. These materials are evolving along with the technology itself. Simple 3D printing takes place by melting a plastic spool. Carbon fiber is used to print patterns that need to be extremely light but durable. Other materials used in the machine or home industry, which are subject to particularly high requirements for durability, moisture, etc. In medicine, the innovator in printing human organs was the Swedish company Cellink, which invented the printing material for human organs.

Figure 10. Printing car parts with a 3D printer

Figure 11. House construction printing with a 3D printer

Figure 12. Organ printing with a 3D printer
3D Printing Process
The printing process can be represented by the sequence shown in Figure 13:

Figure 13. 3D printing process
Once the model has been created by the modelling program, it must be saved in *.STL format. This format is for 3D printing. In this way, the program recognizes the information in the file and divides the model itself into layers. The 3D printer starts working from the lowest layer, filling in all the information. It then moves to the next layer until all the layers are printed vertically.
It is necessary to know the basic parts of a 3D printer to understand the printing process.
There may be various printer modifications depending on the needs, type, price and other criteria. However, the basic parts remain the same. By default, such a printer consists of a spool of material (1). It can be plastic, metal, glass or others. Also the print head (2) moving transversely and longitudinally. The printable height of the model is adjusted by a sliding background (Figure 14).
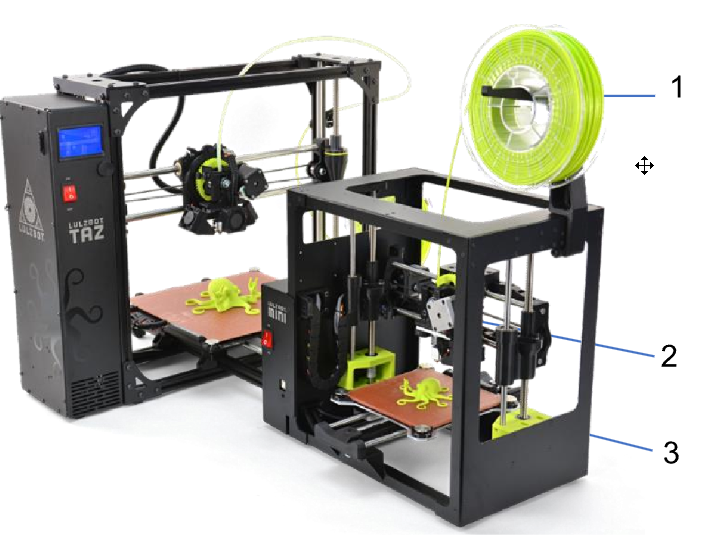
Figure 14. 3D printer
When the model is divided into layers, printing starts from the lowest layer. The print head (Figure 15a), after melting the feed material (1) from the spool, prints one layer horizontally (Figure 15b). Then move on to the next one.

Figure 15a. Printhead

Figure 15b. One layer is printed
3D modelling
In order to transmit the information to the printer, the item must be modelled at first. It is important to notice that the printer "reads" the information consistently, not in the way we see it. That is, if during modelling, we draw a line on a line, we see only one line, and the printer prints the first line first, then the second line on the same layer. This increases material costs and the actual model may be inaccurate. Therefore, in modelling, it is necessary to make sure that there are no duplicates in the layer, that the line layer thickness and other parameters are properly provided.
The choice of a 3D modelling software depends on many factors. This includes user computer literacy, ability to manage a simulation program, your computer’s computational capabilities, project complexity, software license, etc. Licensed and open source programs can be distinguished according to the "availability" of the software. Licensed have far more options. Open source programs are available to every user, are versatile enough for the operating systems, but are more likely to have some “bug” in the software itself.
The most commonly used modelling software is shown in the table below:
|
Proprietary |
Open source |
|
AutoCad |
Blender |
|
Fusion 360 |
TinkerCad |
One of the largest companies involved in modelling software development is Autodesk. It includes AutoCad, Fusion 360, as well as TinkerCad software packages. Tinkercad is available as a free online collection of software tools set which is very handy for usage in schools o for other teaching purposes. Autodesk provides services for both the business classroom and learning purposes. Educational institutions can get a license for products. It is not a complete software package that is paid and intended for the business class, but to study, model and prepare a model for 3D printing is fully sufficient.
Each version of the software is constantly updated and supplemented with additional features. The main goals are to create intuitive software that is as easy to learn as possible for the user. Each of them requires a basic theoretical basis for modelling.